Free Tutorial: Create A Shopify Store
Learn how to set up a Shopify store in 15 easy steps. For this exercise, we’re going to set up a beautiful, beginner-friendly online store that you can customize later with your own apps, like print-on-demand apps, dropshipping apps, or whatever apps you want to add.
Here are the 15 steps we’ll be following:
⦁ Claim your FREE Shopify 14-Day Trial
⦁ Install the FREE Shopify Theme (Simple)
⦁ Create Product Collections
⦁ Add & Edit Simple Product Pages
⦁ Add & Edit Product Pages with Variations
⦁ Create an About Us Page
⦁ Create Contact Us Page
⦁ Setup Payment Processors (Shopify Payments & PayPal)
⦁ Create & Add Legal Pages
⦁ Add Footer & Navigational Menus
⦁ Add Shipping Options
⦁ Customize Store Design & Homepage
⦁ Choose Your Shopify Plan
⦁ Add a Custom Domain URL
⦁ Remove Your Store Password and Send Your Store Live!
Now, let’s get started setting up your Shopify Store!
1. Get A FREE 14-Day Trial For Shopify
First, click here to register for a free 14-day Shopify trial. That link is an affiliate link, which means we may get a commission if you click on it and register for Shopify. Using the link is entirely optional, but it is always greatly appreciated as it helps keep tutorials free!
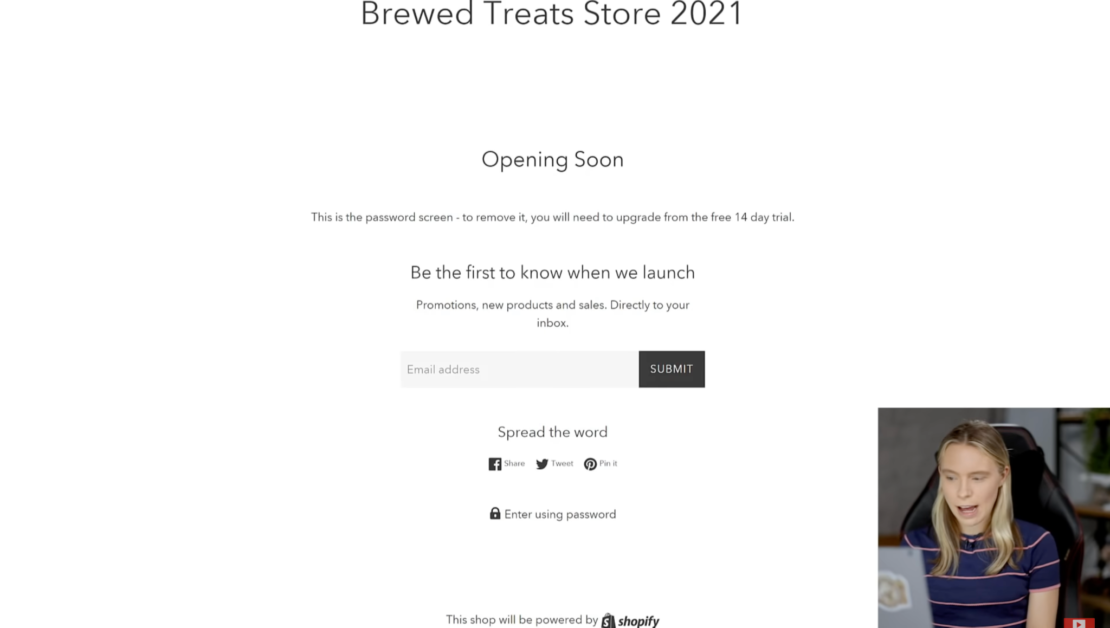
By registering for the trial, you won’t have to pay anything for two weeks while you’re creating and designing your store. The only thing you won’t be able to do during your trial is to open up your store to visitors. While you’re in your two-week trial, your homepage will be replaced with an “Opening Soon” screen like this example one:
Simply, insert your email address, create a strong password, and enter a store name. If you don’t know what to call your store yet, you can simply enter a filler name and change it later.
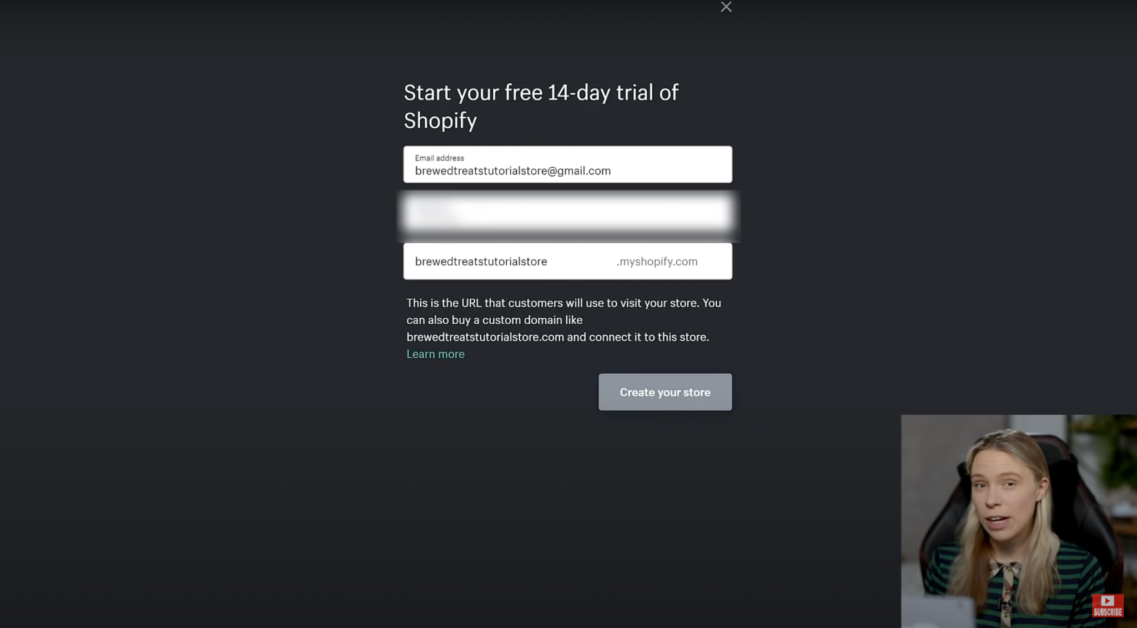
Next, enter your CORRECT address, as this is important legal information required by Shopify to pay you your earnings later on.
2. Install the FREE Shopify Theme (Simple)
When you’re a new seller, you may be wondering whether to choose a free or a paid Shopify theme. We recommend you use a FREE theme. Not just because a paid theme is most likely unnecessary, but also because a paid theme could hurt your sales rather than help them.
Paid themes have a lot of features that free themes don’t. If you don’t know how to use these features, your store may end up looking poorly designed. Beginners often buy paid themes without knowing how to set up their store with the extra settings, whereas the free theme has been carefully designed to not only look esthetically pleasing, but also to be beginner-friendly to use.
To set up the free theme, simply click on “online store” on the left-side menu:
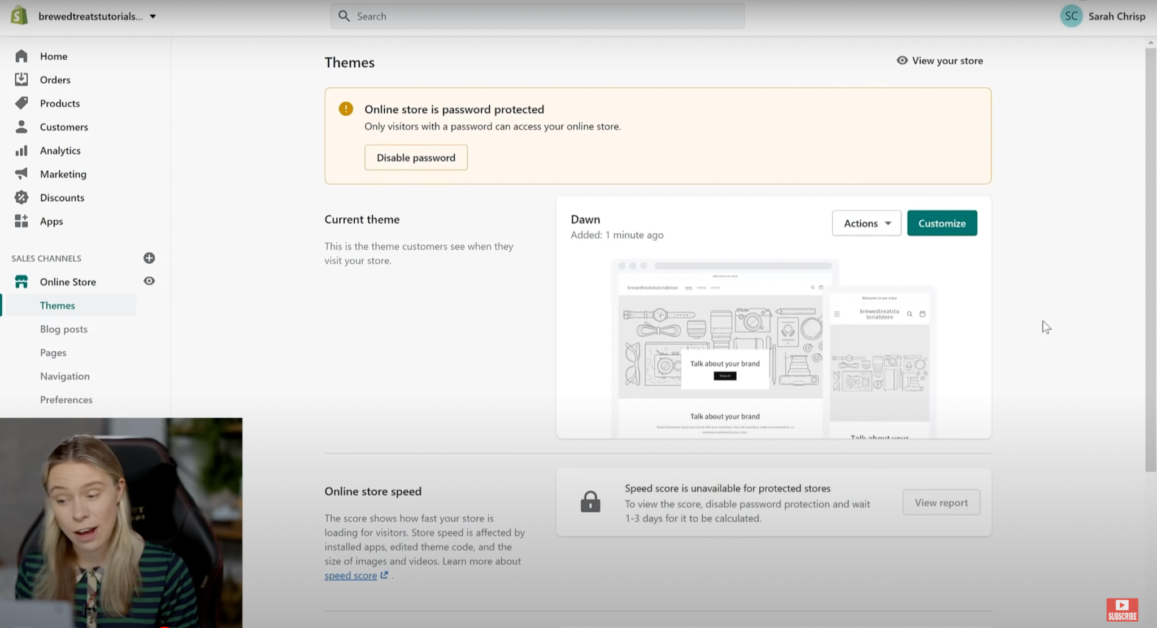
Next, go to “Explore free themes” to replace the pre-installed theme. Scroll all the way down and choose the “Simple” theme. You’ll have the option to choose between three styles: ‘Toy’, ‘Beauty’, and ‘Light’. Choose the ‘Light’ version. Select that option and click “Add to theme library.”
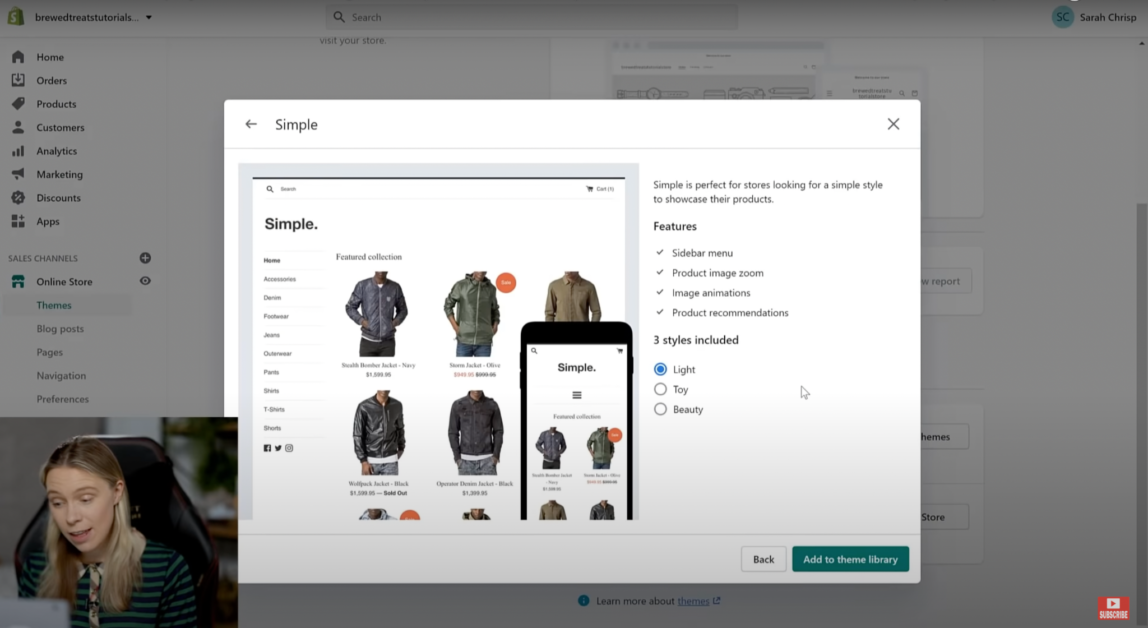
Once it says “Just Added”, click the “Actions” button and scroll down to “Publish.” Now Shopify has replaced the previous theme with the “Simple” theme.
3. Create Product Collections
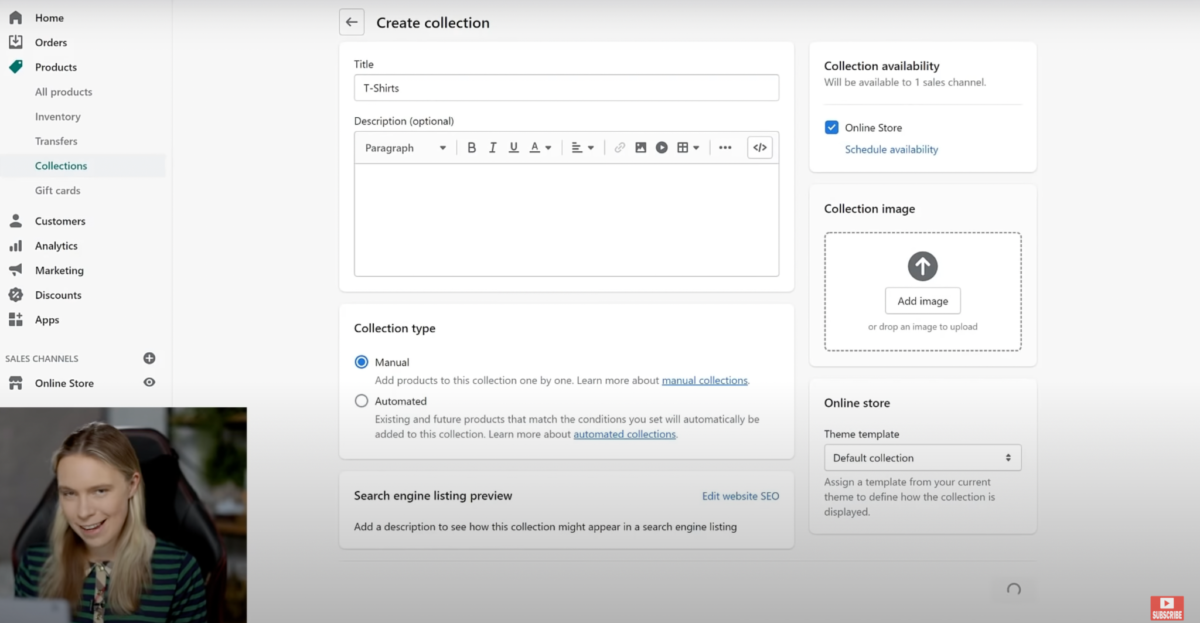
On the left menu, click “Products”, then “Collections,” then click “Create Collections.” Title your collection. For this exercise, we’ll call it “T-Shirts.” Under “Collection type,” click “manual”, and then save the setting. Repeat this step for all your product collections.
4. Add & Edit Simple Product Pages
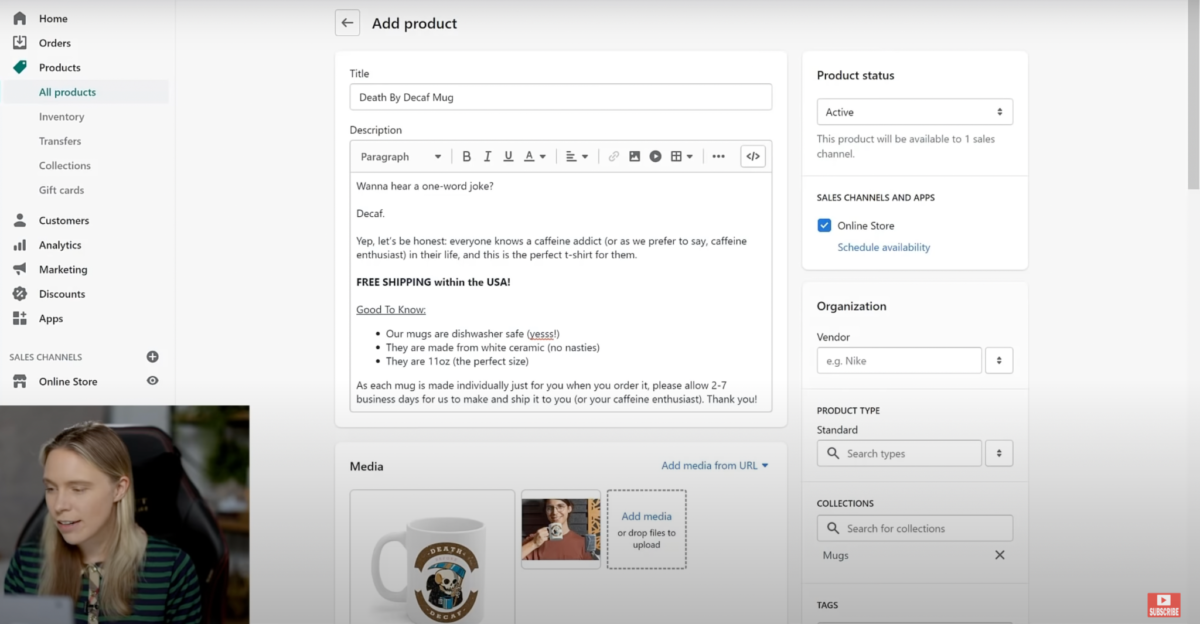
We’ll be adding a simple mug as our first product and using beautiful lifestyle photos to market it. Marketing studies have shown that using photos of your product in real-life settings significantly increases your sales and conversions. Include at least one photo in a real-life context. You can easily create lifestyle photos with your own logos and designs for free on the website Placeit.net.
Now, add a simple product by following these steps:
- On the left-hand menu, click “All Products”
- Click “Add Product”
- Give your product a title
- Enter a simple description
- Scroll down and under “Collections” (on the right-hand menu), select the collection your product is in
- Under “Media”, upload your product photos – the first photo uploaded will be your thumbnail image (simply slide the photo you want as your thumbnail to the first position)
- Insert your product price under “Pricing” – depending on whether you have to charge sales tax, you can click or unclick the option “charge tax on this product.” Use the option “Compare at price” to insert the original price and enter a sales price in the first price space.
- Under “Inventory,” insert the available number of your product. Shopify will track your sales and update your available inventory after each sale has been made. You can untick this option if you have an unlimited number of your product.
- Optional: under “Shipping,” insert the weight of the product
- Optional: edit the product SEO under “Search engine preview”
- Click “Active” under “Product Status” on the right-hand menu.
- Now save.
5. Add & Edit Product Pages with Variations
For products with variations, follow these steps:
- Follow all the steps of ‘#4. Add & Edit Simple Product Pages’
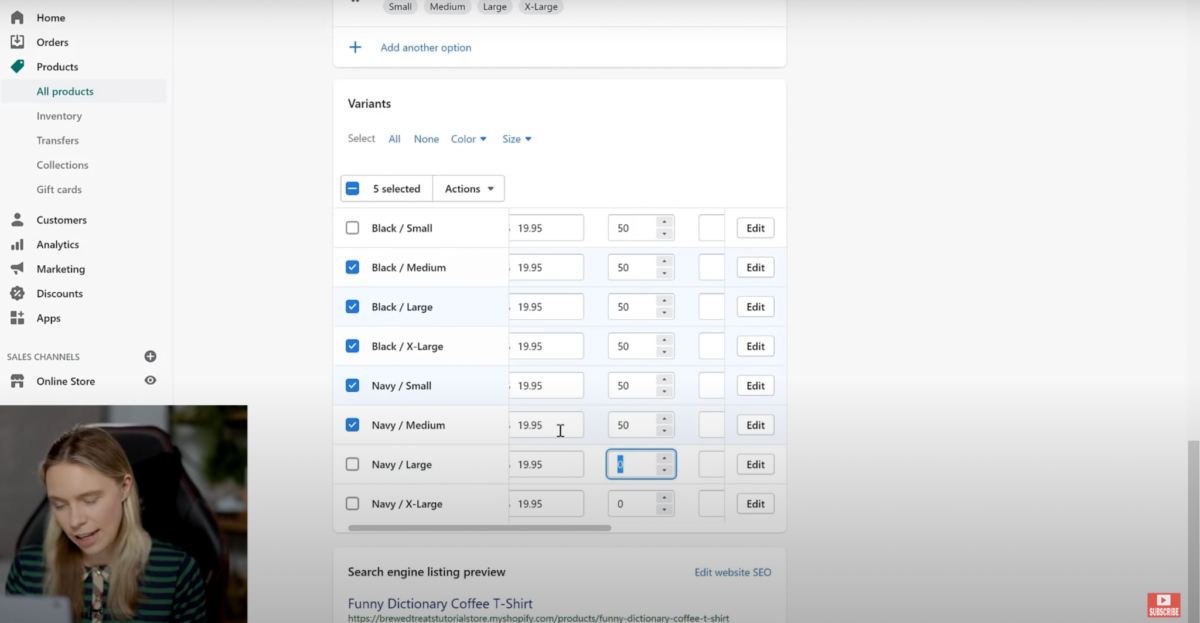
- Under “Options,” insert your variants, including:
- Color
- Sizes
- Edit the available quantity for each variation if you have a limited number
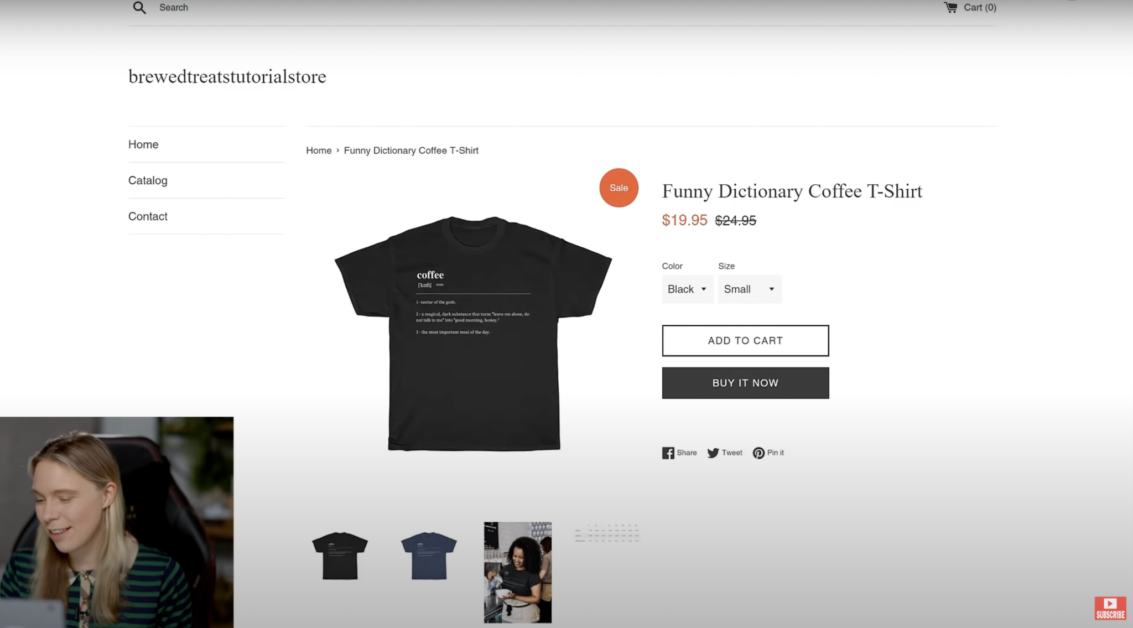
Now you will see the t-shirt for sale in your store and it will look like this:
6. Create an About Us Page
Set up your ‘About Us’ page with these steps:
- On the left-side menu, choose “Online Store”
- Choose “Pages” from the drop-down menu
- Click “Add Page”
- Give your page a title
- Add the content description
- Lastly, save the page
7. Create Contact Us Page
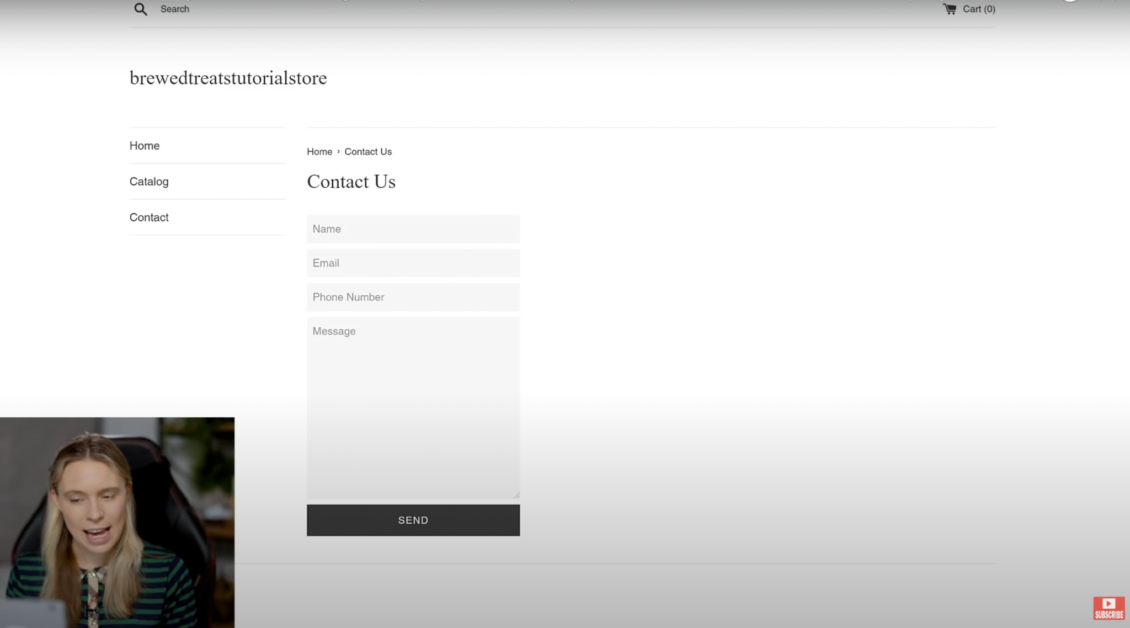
Set up your ‘Contact Us’ page with these steps:
- On the left-side menu, choose “Online Store”
- Choose “Pages” from the drop-down menu
- Click “Add Page”
- Give your page the title “Contact Us”
- On the right side, click “Theme Template” and choose “Contact” from the drop-down menu
- Lastly, save the page
- Bonus: you may insert your phone number or email address in the content section of the form before saving if you wish to display this info
The ‘Contact Us’ page will look like this:
8. Setup Payment Processors (Shopify Payments & PayPal)
By default, Shopify has Paypal installed (connected to the email address you used to register on Shopify) so setting up a payment processor manually is optional. However, we recommend that you install additional payment processors which will make it even easier for customers to use their cards. You will be asked what type of business entity you have. If you haven’t set up a corporation or LLC, you can simply choose the “Individual/sole proprietorship” option.
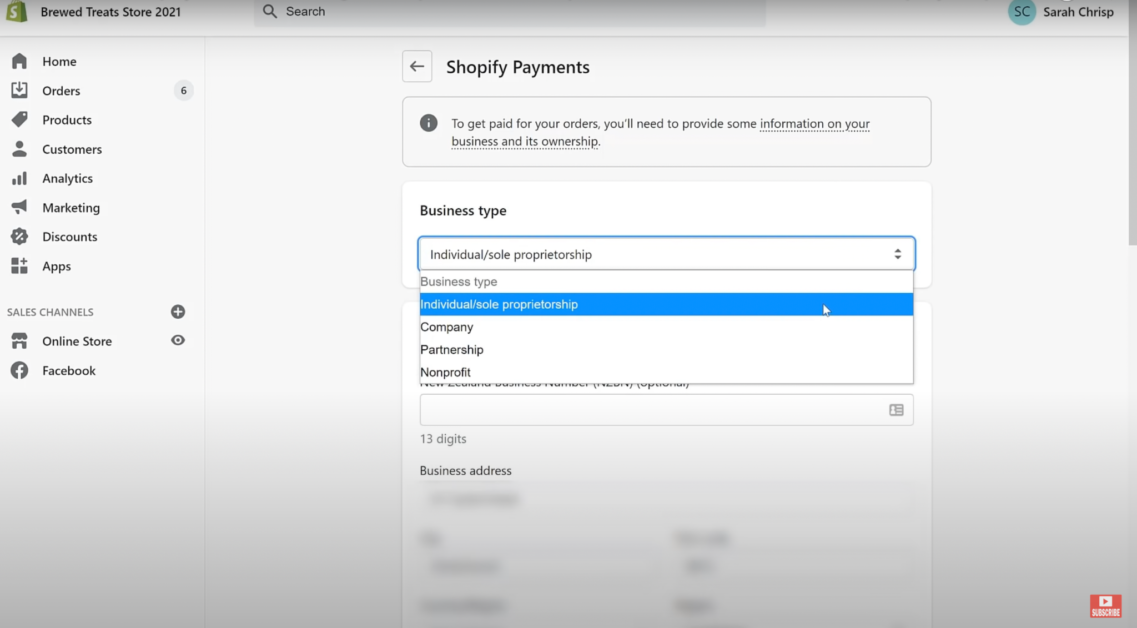
To set up payment processors, follow these steps:
- Click on “Settings” (left-side menu, lower-left corner)
- Choose the “Payments” button in the left-side menu
- Click “Complete Account Setup” under “Shopify Payments”
- Under “Business Type,” select “Individual/Sole Proprietorship” (unless something else applies to you)
- Verify your address information and enter your date of birth
- Select the applicable category under “Business category”
- Select the applicable category under “Business subcategory”
- Insert content in the “Description of product or services”
- “Statement descriptor” under “Customer billing statement” should be similar to your store name so that customers can recognize it
- Enter your phone number
- Enter your banking information
- Lastly, save
9. Create & Add Legal Pages
Shopify has several pre-built templates for the Terms and Conditions, Privacy Policy, Refund Policy, and Shipping Policy. All you need to do is read over these pages and alter them according to your needs.
For the Privacy Policy and the Terms and Conditions, most of the information is complete. You just need to fill out a few sections. For example, in the Privacy Policy, there’s a section that asks you to insert any additional payment types accepted in your store. Fill this section out or delete it if it doesn’t apply.
By default, the Refund Policy templateoffers refunds for ‘change of mind’. If you wish, you may modify this and state that you only accept returns for items that are faulty or damaged.
To set up your legal pages, follow these steps:
- Click on “Settings” (left-side menu, lower-left corner)
- Choose the “Policies” button in the left-side menu
- Under “Refund Policy”, click “Create from template”
- Read through the template and modify it based on your store’s needs
- Repeat these steps for “Privacy Policy,” and “Terms of Service,”
- The “Shipping Policy” offers no template, so simply insert your terms here, including disclaimers for the holidays, etc.
- Lastly, click ‘Save’
10. Add Footer & Navigational Menus
- On the left-side menu, click “Online Store”
- Select “Navigation” from the drop-down menu
- Select the main menu
- Create a subcategory under “Main menu” with your different product collections
- Click “Add menu item”, then select the product under “Link” and “Collection” and click “Apply Changes”
- Next, click “Add” and drag it under the “Catalog”
- Repeat this step for your other products
- Next, click “Add menu item” and add the “Contact Us” page and the “About Us” pages, and then save the menu
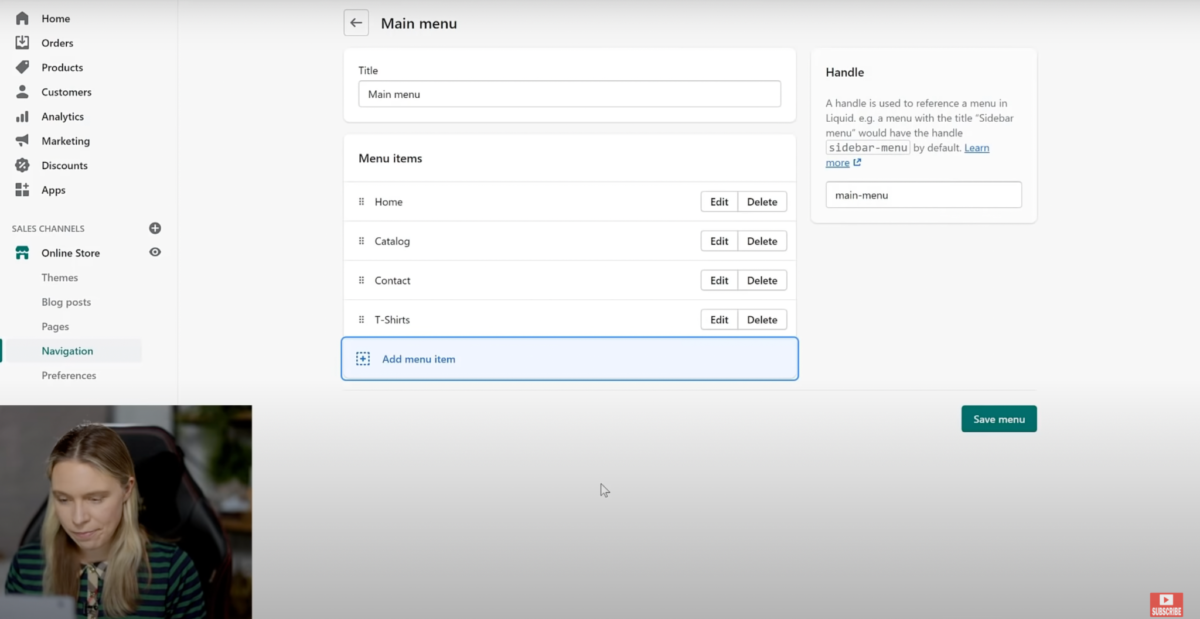
Next, work on your footer by following these steps:
- Select “Add menu item” and individually select all your legal pages under “Policies” and click “Add”
- Lastly, click “Save menu”
11. Add Shipping Options
How you handle your shipping depends on your personal preference. You can opt to offer free shipping and simply calculate it into your product prices, which is easier to set up and makes buying in your store appealing to customers.
Before you set up your shipping options, think about which countries you will be shipping to, i.e., are you willing to ship globally, only to a certain number of countries, or maybe just one country?
Follow these steps:
- Select “Settings” in the left-side menu
- Select “Shipping and Delivery”
- Click on “Manage Rates”
- You will see that Shopify has created – by default – a domestic shipping option based on where you are located, and a “Rest of World” option
- Delete the Shopify-suggested shopping options to customize your own
- Click “Create Shipping Zone”
- Add in zone name (this is just for your own reference, customers will not see this)
- Next, select the countries that you will be shipping to
- Then, click “Add rate”
- For Free Shipping:
- Under “Rate name,” type in “Free shipping,” and set the price to $0.00
- Next, click “Conditions,” and select “based on order price”
- Set the minimum price at $1 and leave the maximum price space empty —> this will allow customers to get free shipping on all their orders
- For Paid Shipping:
- Under “Rate name,” type in “Standard shipping,” and set the price to your preferred shipping rate, e.g. $5.00
- Next, click “Conditions,” and select “Based on order price”
- Set the minimum price at $1 and the maximum price to your preferred max price, e.g. $19.99. This means customers who order products less than $20 will be charged for shipping, and will thus be encouraged to order more to take advantage of your store’s free shipping
- Click “Done”
12. Customize Store Design & Homepage
Before customizing your storefront, you will need the following:
- A logo – If you don’t have one yet, you can easily have a logo created for a mere $10 at this Fiverr gig. You can also make one yourself using Canva
- One image – This image is for your homepage banner and should be 1000 x 550 pixels in size
We have broken down this step into three parts:
- Customize the Homepage
- On the left-side menu, click “Products”, then “Collections”, then “Create Collection”
- Insert a title (this will only be seen by you)
- Collection type should be set to ‘manual’, then save
- Scroll down to the product section and click “Browse”
- Choose your 12 favorite products (recommendation: if you have sales data, choose your 12 bestsellers), then click “Add”
- You may now change the order of these products by simply clicking the “Sort” drop-down menu. Select “Manually.” Now you can drag and drop your products in your preferred order which will automatically be saved
- Next, click on the “Online Store” option on the left-side menu and you’ll automatically be on the “Themes” page. Click “Customize”
- On the right side, choose “Select Image” and upload your store logo (resize it to your preferred size)
- Next, go to “Featured Collection” on the left-side menu and choose “Change Collection” on the right side. To have all of your 12 products showing, change the “Rows” on the right-hand side to 4
- On the left-side menu, click “Add Section,” and choose “Slideshow”
- Click on “Slide” (left-side menu), then “Select Image” (right-side menu), and upload your homepage banner image. Choose 0 for “Overlay Opacity.” Add as many more pictures as you like to appear in the slideshow.
- On the left-side menu, make sure the section order is correct (first “Slideshow”, then “Featured Collection”, so that your banner appears at the top of your page).
- Customize the Footer –
- On the left-side menu, click “Footer”, then “Add block”, then “text”
- Choose a headline that briefly describes your products. In our example, we write “About The Mugs”, and then add some content. Save this and then click “Add block”
- Now add a Newsletter Signup, add some text and click “Save”
- Customize the Store Design –
- For this part, you need a favicon image, at least 32×32 pixels in size. This image will be visible in your store’s browser tab. You can create this on Canva
- Next, choose a color that goes with your store’s theme and products
- On the right-side menu, click “Theme Settings,” click on “Colors,” then on “Links and primary button.” Select a color from the box or insert the hex code if you know it. This will change the color of the buttons on your page
- Do the same for “Sale Tags” and “Borders and Lines” by changing to your preferred color
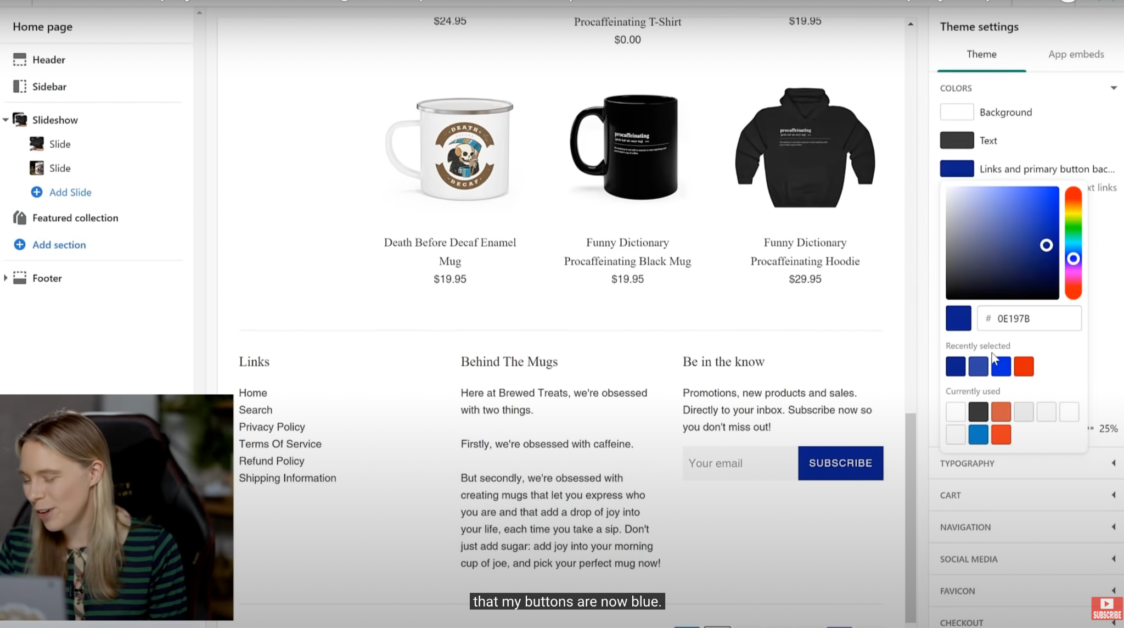
- Now, change the font of your store by clicking on “Typography” on the right-side menu and then clicking “Change” under “Font.” Select a font that goes with the theme of your store
- Do the same for the “Body text”
- Keep both the “Cart” and the “Navigation” as they are
- Click “Social Media” and insert your social media links which will then appear as little clickable buttons on your page
- Add your favicon image by uploading it
- Under “Checkout,” add in your logo in a large size
- Change “Accents” and “Buttons” to your store’s color theme
13. Choose Your Shopify Plan
To be able to launch your store, choose one of the following Shopify plans:
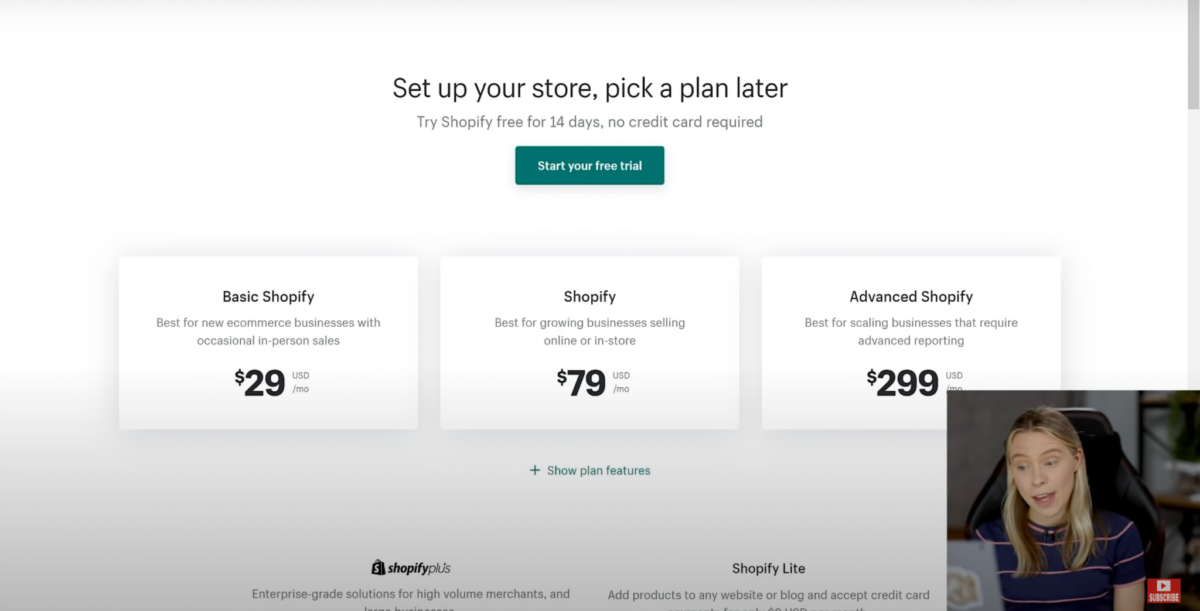
Note that the more expensive subscriptions give you a discount on credit card processing fees. Select the cheapest plan, unless you already have a customer base regularly buying from you.
- Click “Settings,” then “Plan,” then “Choose Plan”
- Insert your payment information and confirm
14. Add a Custom Domain URL
Switch your domain name to a .com unless you are targeting only one specific country. For example, if you were to only sell in Australia, choose a .com.au ending for your custom domain URL.
- Click “Settings,” then “Domains,” then “Buy new domain”
- Insert your preferred domain name and buy it. Stick to the .com domain name and disregard the other options
15. Remove Your Store Password and Send Your Store Live!
After purchasing a Shopify plan, you can remove the password page and “Opening Soon” placeholder. Now, follow these steps:
- On the left-side menu, click “Online Store”, then “Preferences,” then scroll down to the “Password Protection” box.
- Untick “Enable password,” then click “Save”
And that is it, you are done! Congratulations on launching your new Shopify store!

